The features described in here are not available in the free version.
Widgets can be set to automatically send resized images to:

Widgets set for sending are showing a black hole in the right bottom corner
with the appropriate icon for each sending option.
In order to successfully send an email the appropriate settings must be set.
All the fields must be filled correctly!

From
The "From" field specifies who is sending the email.
Enter your email address. If you want to add your name, you have to put the email address in brackets.
|
|
|
|
John Doe <> |
john.doe John Doe webuser_16 John Doe |
To
The "To" list specifies to whom the images are to be sent.
You can choose if one recipient can see all recipients or not:
The addresses have to be separated by commas or new lines.
Acceptable formats of the recipient's address are the same as for the "From" field.
Note: There is no preview of the email before sending! Put only your email address in the "To" list to test the resizing and all other parameters - when you're happy with the settings add the other recipients.
Subject
Define freely the subject of the email message.
You can also use several predefined parameters:
| %n | Names of all images | DSC001.jpg, DSC002.jpg, DSC003.jpg, DSC004.jpg, DSC005.jpg, ... |
| %n3 | Names of the first 3 images | DSC001.jpg, DSC002.jpg, DSC003.jpg |
| %ns | Simple names of all images | DSC001, DSC002, DSC003, DSC004, DSC005, ... |
| %ns3 | Simple names of the first 3 images | DSC001, DSC002, DSC003 |
| %s | Size of attached images | 15.34 MB |
| %a | Number of attached images | 7 |
| %d | Date of email in short format (dd.mm.yyyy) | 15.04.2013 |
| %df | Date of email in full format (Day, d Month Year) | Monday, 15 April 2013 |
Examples:
Enter:
"Latest %a pictures of baby John: %n3 and more (%df)"
to get:
"Latest 7 pictures of baby John: DSC001.jpg, DSC002.jpg, DSC003.jpg, and more (Monday, 15 April 2013)"
Remember: There is no preview of the email before sending! Put only your email address in the "To" list to test the resizing and all other parameters - when you're happy with the settings add the other recipients.
Mail Account settings
You need an email server to send the emails.
There are 4 predefined email account settings for some of the major email providers:
To use one of the four predefined email providers, simply enter your username (usually your email address) and your password.
For any other provider, open your email client (Outlook, Thunderbird, etc.) and write down the settings. You will need the URL, Port, Username and SSL parameters.
Enter the settings:
Check the "Show messages" to see a sending successful notification (If an error occurs, a notification will be shown nevertheless).
Click "OK" to save the settings.
You can edit the settings at any time. Choose an email account from the drop down list, edit the fields and click "OK" to save the changes.
Once defined, each email account can be used in multiple widgets.
User defined email accounts can be removed by choosing one from the drop down list, and clicking on the "Delete" button.
Important!
Changes on an email account's settings will be applied globally - on all widgets using that email account.
Tip:
If you want to use multiple Gmail, Yahoo! or any other email provider accounts, define new email accounts using the same email server settings but with different username/password combination and give them unique names.
Note:
All the credentials are safely stored in Adobe's Encrypted Local Storage.

Enter the settings:
Check the "Show messages" to see a sending successful notification (If an error occurs, a notification will be shown nevertheless).
Click "OK" to save the settings

There are two ways to select target folder - manually entering a path to a folder, or choosing a folder from the browse folder dialog.
Check the "Show messages" to see a sending successful notification (If an error occurs, a notification will be shown nevertheless).
Click "OK" to save the settings

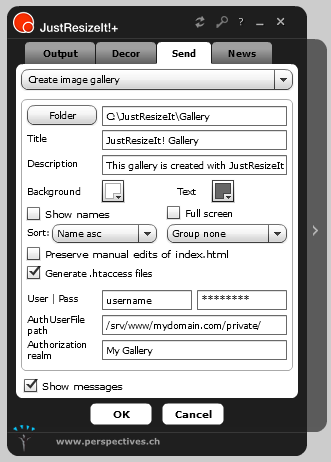
JustResizeIt!+ generates a complete gallery solution. In order to do that, all the text fields in widget settings have to be filled in, so let's go through each one of them:
Check the "Show messages" to see a sending successful notification (If an error occurs, a notification will be shown nevertheless).
Click "OK" to save the settings